Anura Core SDK for iOS
Anura Core SDK for iOS provides all the essential components for integrating NuraLogix Affective AI and DeepAffex into your iOS application. It includes DeepAffex Extraction Library, a DeepAffex Cloud API client, a camera control module, a face tracker, and other components to allow your application to take measurements using DeepAffex. This is the same SDK used to build Anura Lite by NuraLogix.
Requirements
The latest version of the Anura Core SDK for iOS is 1.9.2. It requires Apple iOS 13.0 or higher. For a detailed list of requirements, please refer to the platform requirements chapter.
Setup
Accessing Anura Core SDK and Sample App
Please contact NuraLogix to get access to the private Git repository.
Dependencies
-
Run
pod installunder the root folder of the sample project. If you start your own project, please configure yourpodfileaccordingly. -
Anura Core SDK for iOS frameworks are included in
./Frameworks. They are already configured in sample project's target Build Settings. If you start your own project, please configure the frameworks in your project's target Build Settings.
Using the Core SDK
DeepAffex License Key and Study ID
Before your application can connect to DeepAffex Cloud API, you will need a valid DeepAffex license key and Study ID, which can be found on DeepAffex Dashboard.
The included Sample App sets the DeepAffex license key and Study ID in
Config.swift file, which would get included in the application at
build time.
AnuraMeasurementViewController
Anura Core SDK for iOS provides a AnuraMeasurementViewController class
that integrates the various components of the SDK, from fetching camera video
frames all the way through rendering the video in the UI. It also provides
delegate methods to observe the measurement state and lifecycle.
Measurement Constraints
Anura Core SDK utilizes the Constraints system of DeepAffex Extraction Library to check the user's face position and movement, and provide actionable feedback to the user to increase the chances of a successful measurement.
You can use the MeasurementConfiguration object when instantiating a
AnuraMeasurementViewController to configure the default set of constraints.
The flags and their explanation are given below:
     /// A Boolean value that determines whether the default face position and movement
     /// constraints before the measurement starts are enabled — Default is `true`
    public var defaultConstraintsEnabled: Bool

    /// A Boolean value that determines whether the default face position and movement
    /// constraints during the measurement are enabled — Default is `false`
    public var defaultConstraintsDuringMeasurementEnabled: Bool

    /// A Boolean value that determines whether the lighting quality constraint is
    /// enabled — Default is `false`
    public var lightingQualityConstraintEnabled: Bool
If the default configuration is not sufficient, then you can manually configure
the constraits by calling the following methods on a AnuraMeasurementViewController:
/// Enable a DeepAffex Extraction Library constraint
   /// - Parameter key: The constraint key
   public func enableConstraint(_ key: String)

   /// Disable a DeepAffex Extraction Library constraint
   /// - Parameter key: The constraint key
   public func disableConstraint(_ key: String)

   /// Sets the value of a DeepAffex Extraction Library constraint
   /// - Parameter key: The constraint key
   /// - Parameter value: The value of the constraint
   public func setConstraint(key: String, value: String)
In the iOS Sample App, you can also refer to
MeasurementDelegate.swift to know how to configure constraints.
    func anuraMeasurementControllerDidLoad(_ controller: AnuraMeasurementViewController) {
        print("***** anuraMeasurementControllerDidLoad")

        // Create a MeasurementResultsSubscriber object to receive live results during a measurement
        self.measurementResultsSubscriber = MeasurementResultsSubscriber(token: api.token)
        self.measurementResultsSubscriber.delegate = self

        // Store weak reference to AnuraMeasurementViewController to use it to decode measurement results
        self.measurementController = controller

        // This is where constraints can be configured
        // Example:
        //
        // controller.enableConstraint("checkBackLight")
        // controller.setConstraint(key: "maxMovement_mm", value: "6")
    }
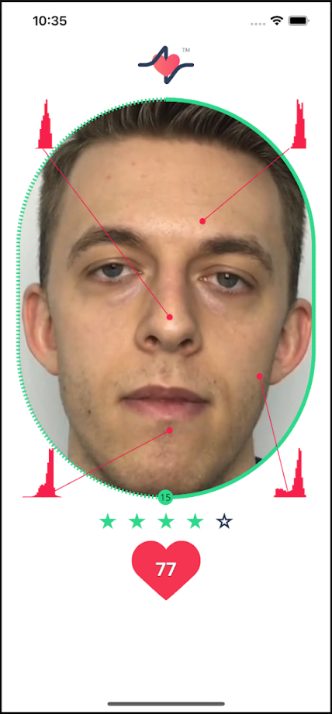
Measurement UI Customization
The exact measurement UI from the Anura App is available in
AnuraMeasurementViewController (including stars, beating heart etc.) You can
programmatically show or hide any element on the screen through
MeasurementUIConfiguration. If you want to create your own UI, can you use
MeasurementUIConfiguration to hide all the default UI elements and implement
your own UI and place them on top of the camera view.
@objc @objcMembers public class MeasurementUIConfiguration : NSObject {

    ......

    @objc public var showHeartRateDuringMeasurement: Bool
    @objc public var showHistograms: Bool
    @objc public var showStatusMessages: Bool
    @objc public var showMeasurementStartedMessage: Bool
    @objc public var showCountdown: Bool
    @objc public var showOverlay: Bool
    @objc public var showMeasurementOutline: Bool
    @objc public var showLightingQualityStars: Bool
    @objc public var showFacePolygons: Bool


    ......
}
And you can also customize the font and color of some elements according to your needs:
static var exampleCustomTheme : MeasurementUIConfiguration {

    ......

    // Customize Fonts
    uiConfig.statusMessagesFont = UIFont(name: "AmericanTypewriter", size: 25)!
    uiConfig.countdownFont = UIFont(name: "AmericanTypewriter", size: 80)!
    uiConfig.heartRateFont = UIFont(name: "AmericanTypewriter-Bold", size: 30)!
    uiConfig.timerFont = UIFont(name: "AmericanTypewriter-Bold", size: 10)!

    // Customize Colors
    let greenColor = UIColor(red: 0, green: 0.77, blue: 0.42, alpha: 1.0)
    let darkMagentaColor = UIColor(red: 0.77, green: 0, blue: 0.35, alpha: 1.0)
    uiConfig.overlayBackgroundColor = UIColor(red: 0.2, green: 0, blue: 0.09, alpha: 0.75)
    uiConfig.measurementOutlineInactiveColor = .darkGray
    uiConfig.measurementOutlineActiveColor = darkMagentaColor
    uiConfig.heartRateShapeColor = greenColor
    uiConfig.lightingQualityStarsActiveColor = darkMagentaColor
    uiConfig.lightingQualityStarsInactiveColor = .darkGray
    uiConfig.statusMessagesTextColor = .white
    uiConfig.statusMessagesTextShadowColor = .black
    uiConfig.timerTextColor = .white
    uiConfig.heartRateTextColor = .white
    uiConfig.heartRateTextShadowColor = .black
    uiConfig.histogramActiveColor = greenColor
    uiConfig.histogramInactiveColor = darkMagentaColor

    ......

}
You can refer to MeasurementUIConfiguration+CustomTheme file for an example
A screenshot of the default measurement UI is shown below: